wadesgirl
Gold Member
- 11,412
Follow along with the video below to see how to install our site as a web app on your home screen.
Note: This feature may not be available in some browsers.
chefann said:My BIL's b'day was at the end of March, and my sister used the Wilton castle set to make him a cake (my nieces wanted Daddy to have a castle cake). We used the new chocolate Skittles as rocks around the base, and on the roofs of the turrets. And then we put a Lego dragon on it.
It was in last months Family Fun..yellow cake, frosting and crushed nilla wafers! The kids "tore it up"! LOL!!Jennie4PC said:Erin how did you do that cake it looks awsome.
Jane your story totally reminded me about a party I went to in July. The girl used 5 bags of powdered sugar for her frosting.
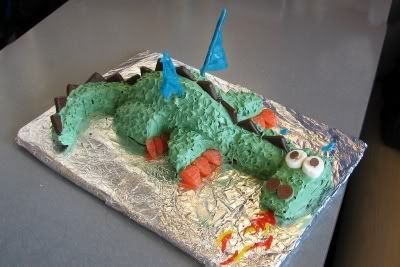
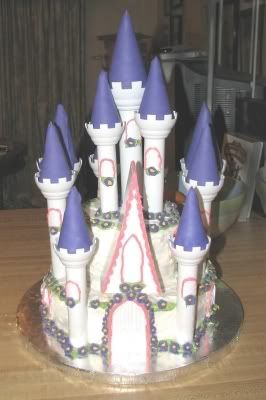
4kids4me said:Here are cakes I made last year. The dragon was for the Twins' 2nd bday and the castle for my dd's 4th. The dragon is from Family Fun and the castle is a Wilton cake kit. (hope this works -thx for the help!)


baychef said:We have some budding cake makers here!! Excellent cakes!!!
In high school I was a self taught cake decorator. I actually sold wedding cakes.
When you are stacking cake layers, here is how to make them not sink down:
Layer One:
Say for example you have 2 - 10 inch round cake.
First, I level off the rounded top on both layers. Place the first cake flat side down onto the platter that you are going to present the cake on.(or the bottom of the cake when it came out of the pan).
You can take apricot jelly and heat it. Brush this all over the cake with our silicone brush and let it dry just a bit so the frosting has this to stick to and it also helps get the crumbs under control.
Frost this and make it no thicker than roughly 1/4 in because when weight is put on it, the frosting will bulge out the sides. There will be some places you may have it a bit thicker, because with our large spreader you can make it a flat surface.
Then place the next layer on top...but make sure you have the "bottom" of the pan" side facing up. (the two layers that were leveled off, should be facing each other). Again, brush more of the warmed apricot jelly on the cake and let it dry somewhat.
Continue to frost tops and sides. You may want to run your spreader under very warm water (shake off most of the water) then continue to work on smoothing the frosting. Make sure not to use too much water because when it dries, it will form a "crust" that will easily crack.
Purchase 1/4 inch wooden dowels in the hardware store. Cut 4 pieces that are slightly shorter than the height of the cake. Place them gently in the center of the cake in a square pattern approximately 2 inches apart.
Purchase cake cardboard that is 8 inches wide.
Layer Two:
Take 2 - 8 inch cakes.
Repeat the steps above only place this cake on to one of the 8 inch cake boards.
When you frost the entire 8 inch layer, frost over the sides of the card board to hide it.
By doing this, it distributes the weight onto the dowels and cardboard instead of "squishing" the bottom cake.
Cakes can crack...just think of your frosting as "the glue". Thin it down and patch up the cake.
For coloring, use Wilton paste colors. Also, add a very small amount of white corn syrup in the frosting you want to color so the colors will not streak.
It you want white frosting...do not use milk in your frosting, use water.
I stopped doing cakes when the nervousness I went through was greater than the pleasure!! If I could only decorate, I would be happy!!! That was my favorite part. Watch cake challenges on the Food Network or the Ace of Cakes!!! The talent is unbelievable! They are truely artists as well as chefs.
baychef said:Oh the stories I could tell you about the good the bad and the just plain near disasters I have had in my cake days!!
Purchasing a Wilton cake decorating yearbook should give you some good tips too (at least they used to, it has been years since I purchased one).
Good luck!! And keep sharing those pictures!:chef:
One option is to use skewers to provide support for the layers. Alternatively, you can use wider drinking straws to provide stability. Both methods have been used successfully by other bakers.
The recipe calls for 6 or 7 layers, but it can vary depending on the size of your pans and how much batter you use. If you are using smaller pans, such as 9x6, you may end up with fewer layers.
Yes, you can use different sized pans to make this cake. If you don't have an 8x8 or 9x9 square pan, you can use two 9x13 pans and cut the cakes in half to create your layers. Just be aware that this may affect the number of layers you end up with.
It is generally recommended to frost each layer separately and then assemble the cake. This will ensure an even distribution of frosting and help prevent any sliding or toppling of layers. However, if you are comfortable with assembling the cake first, you can do so as well.
Make sure to follow the recipe closely and read through all the directions before beginning. It may also help to refrigerate the cake before serving to help it hold its shape. And most importantly, have fun and don't be afraid to get creative with your decorations!